 Yikes! Only 20 days until Halloween! Can that be right? I love Halloween, because you can be anything you wanna be. It is just so fun! I must admit, I don’t really like coming up with a costume. I don’t like the extra expense and it is one more time that I have to admit to myself how much weight I have gained despite my best intentions. It is also a reminder of how close the end of the year really is! I still love Halloween despite these reasons and it gives me lots of fun crafting ideas, great pictures to scrapbook, a reason to make mini scrapbooks and cards for my dear friends, and it is a great time to bake my favorite fall foods! Yummo!
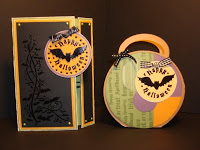
~Tips and Techniques Used~
I used heat embossing to create the bat flourishes and “Happy Halloween”on this card and treat bag. To heat emboss on your projects, choose your My Acrylix Stamp, ink it with VersaMark ink, and stamp as desired. Generously sprinkle embossing powers on the entire stamped image, shake into craft tray or back into original jar, and heat image with a craft heater. Be careful to only heat until the powder transforms into a nice shine. I like to just wave my craft heater in a circular motion about four or five inches above my project.
I also used some black Bitty Brads in the bat fourishes and Twinkle Brads in the corners to give my card extra texture. So the back of the brads don’t show inside the finished card, I use the Piercing Tool Kit to make little holes on the black cardstock where I want to place my Bitty Brads and Twinkle Brads. Once the brads are in place with the two posts spread open on the backside, I place my project on a flat surface and use the wood end of the peircing tool to push the brads on the flat surface to flatten them out.
Now I attach the black cardstock with your favorite adhesive after sanding the edges. Here, I layered my black cardstock onto Autumn Terracota cardstock attaching this piece to my Olive card. Additionally, I chalked the cardstock edges of my treat bag project to make them stand out a bit using the applicator in the Soft Chalks. Try these techniques on your projects.
